HARDWOOD INSTALLATION AND REFINISHING

We provide hardwood floor refinishing and installation at very competitive rates. In fact, our rates are among the lowest in the Philadelphia and surrounding areas. We specializes in hardwood floor installation, hardwood floor refinishing, repairs, as well as custom and exotic hardwood floors. We also retail unfinished hardwood flooring, prefinished flooring, as well as engineered flooring. There are many products on the market today for finishing hardwood floors.

We offer 3 types of finishes, all being no-wax finishes, which means low maintenance.

 #1 finish is our Commercial Grade Polyurethane. It is one of the most commonly used finishes on the market today and is very durable. This finish is available in satin, semi-gloss, and high-gloss. The most popular being semi-gloss.

 #2 finish we offer is a Swedish finish. Swedish finishes are also very durable, but also very smelly. The finish is available in matte, semi-gloss or gloss.

 #3 finish we offer is a Water Borne finish. It is fairly new to the market, but has proven to be very durable.

If there is another finish you prefer over these 3 we will gladly use that product instead.


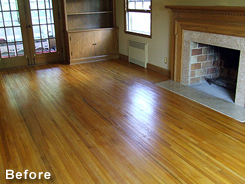
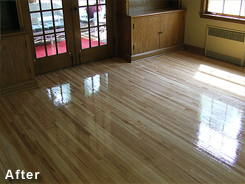
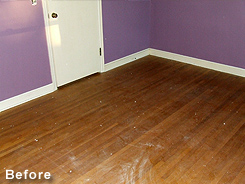
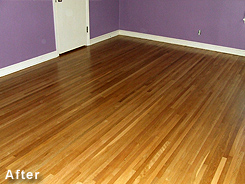
 ACC Flooring had a challenge on its hands when it refinished the hardwood floors in this Elkins Park home. This home’s wood floors had been neglected: look at the stains and build up in the before pictures. This hardwood floor also had a yellow tint which is a result of an oil based polyurethane finish being used the last time this hardwood floor was refinished. You can tell from the after picture that we took the time and really worked hard on the stressed areas of the hardwood floor. The stains and build up are gone in the after picture and the hardwood floor has returned to a more natural state
                                                         
                                                      
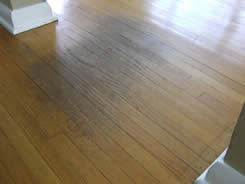
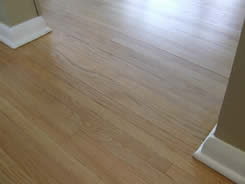
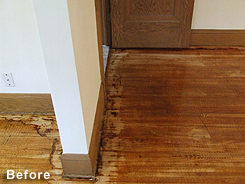
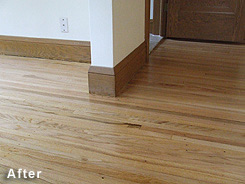
 Often homeowners will ask us if we can fix spots such as this. More often than not, the visual damage to the hardwood floor is just at the top layer. So, when we begin the hardwood floor sanding process, we will actually remove this top layer of "damage" and bring the floor back to life. Were actually just exposing hardwood beneath the current surface by sanding it off. It looks great doesn't it?


Click here or any image to view the gallery 


Drying Time - Just prior to applying the finish, the heat needs to be set at 71 degrees in order for the finish to dry. This takes about 6 to 8 hours.
DO NOT walk on the floors prior to being dry because imprints will occur. Appliances - Be careful when moving appliances. You should use a dolly or lay down plywood and move in the appliances over it. This is so the casters on the appliances won’t leave indentations in the finish.

Furniture - Put fabric-faced glides on the legs of your furniture. They allow furniture to be moved easily without scuffing the floor. Clean the glides regularly because grit can become embedded in them. Some furniture may require barrel type roller casters, as ball type casters may cause damage. Grey, non-marking rubber casters are the best. Avoid any type of plastic caster.

Color Changes - Certain chemicals in wood oxidize in strong light, causing the wood to change color (weather or age) i.e.; develop patina. To avoid uneven appearance, move area rugs occasionally and drape or shade large west-facing windows. High Heels - Keep high heels in good repair. Heels that have worn down or lost their protective cap, exposing the steel support rod in the heel, will dent any floor surface, even concrete.
Animals - It is recommended that you clip your pets nails monthly or walk them on concrete to dull their nails.


Caring For Your Floors Vacuum - Vacuum regularly, as often as you vacuum carpets. A brush attachment works beautifully. Sweep or use a dust mop daily or as needed, but DO NOT use a household dust treatment as this may cause your floor to become slick or it may dull the finish.
Cleaning - For general cleaning, add 1 cup of white vinegar to 1 gallon of luke warm water. Dip a clean cloth or a sponge mop and wring nearly dry. Clean floor and wipe dry with a towel as you go. This procedure is recommended once a month. Weekly you can use Dura-Seal® Hardwood Floor Cleaner, designed for hardwood floors. Call us for more information on this product. Do not use an oil soap or any cleaning product that mixes with water. Ammonia will damage or dull many surface finishes and should not be used to clean your floor.

Waxing - NEVER WAX a surface finish. Wax will, in most cases, be slippery. Once waxed, the floor will not be able to be recoated to rejuvenate it. It will have to be completely sanded down to raw wood to restore the floor.


Cracks and Squeaks
All the wood in your home will contract or expand depending on the moisture in the air. Doors and windows may swell and stick during rainy seasons. In dry, cold weather, cracks and fine lines of separation may appear in wall cabinets and furniture. This is characteristic of wood because wood is a product of nature, and its natural quality is what makes it desirable.
Cracks - Reaction to humidity, or the lack of it, is happening constantly in your wood floors. Tiny cracks between the edges of boards may appear when dry conditions are produced by your heating system. This can usually be REDUCED by installing a humidifier. With a proper balance of moisture in the house, both family and floors benefit from a healthier environment.
Squeaks - When interiors become damp, the boards in your floor may expand and rub together producing a squeak. Improper fastening of the floor or sub floor can also cause squeaks. To correct this, first try lubrication. A liberal amount of liquid wax may do the job. You can also sift a small amount of powdered soup stone, talcum powder, or powdered graphite between adjacent boards where the noise occurs. Another method is to drive triangular glazier points between the strips using a putty knife to set them below the surface.
If that doesn’t work, drive 2 finishing nails through pilot holes drilled into the face of the flooring. Nails should go through both edges of the boards. Set them with a nail punch and hide with matching color putty. The best solution requires more work and can be accomplished only where there is access to the floor from below (crawl space or basement). Wood screws are inserted through the sub-floor and into the finish floor to pull the finish floor down tight.


Periodic Care Recoating - When luster does not return in traffic areas such as doorways, kitchen sink, stove area, or hallways, the floor may need recoating. When this happens it’s time to call us for recoating.

Refinishing - Wood floors that have become unsightly from years of wear or neglect can be restored to their original beauty. Machine sanding removes the old finish and exposes new wood. With the application of a finishing material, floors are like new again. We highly recommend you call us to have your wood floors professionally refinished. IMPORTANT!


                                                                              Back to home            Contact us